Manage Users via Spreadsheet Upload
- Access the
 User Search.
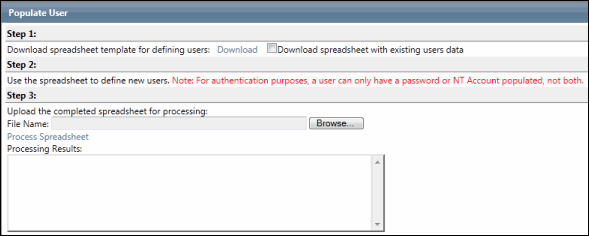
 - Click Upload Users.

- Click Download.
Note: Select the Download Spreadsheet with Existing Users Data check box to include the existing user information in the spreadsheet.
- Populate the Excel upload spreadsheet (see Spreadsheet Population Notes below), and save the file to your hard drive.
- Return to the Governance Portal and click Browse on the Population screen.
- Locate the modified upload spreadsheet.
- Click Process Spreadsheet.
- Check the Processing Results box for any errors that may have occurred during import. If an error occurs the spreadsheet processing will fail, no records will be created. Return to the Excel template, and make necessary modifications as directed through the Processing Results box.
Note: You can now update the passwords for multiple users at once after a Governance Portal update, while performing mass user update via the Excel spreadsheet. The mass password update will not reset any existing passwords.
Validation Notes
Validation
Portal Reaction
Suggested Corrective Action
Invalid email address format
Entire import is rejected
Verify the email address format of users.
Missing last name
Entire import is rejected
Enter a last name for the user.
Missing password
Entire import is rejected
Enter a password. Passwords must be alphanumeric and at least 6 characters long.
Password needs letters and numbers.
Entire import is rejected
Verify passwords are alphanumeric.
Email address not unique
Entire import is rejected
Verify email address is unique for each user.
Network ID not unique
Entire import is rejected
Verify network ID is unique for each user and contains the user domain name.
Column Headings - Entries
Actions
Action
Required: Select the action (create, update, delete) from the action drop-down list for each record.
User Email
Required. Type in a valid email address for the user. This address is used in sending user notifications (welcome, workflow tasks, assessment/reviewer email etc.)
User First Name
Optional. Type in the user's first name.
User Last Name
Required. Type in the user's last name.
User Title
Optional. Type in the user's title.
User Phone 1
Optional. Type in a primary contact number.
Note: Up to three hyphens (-) can be entered in a phone number.
User Phone 2
Optional. Type in a second contact number.
Note: Up to three hyphens (-) can be entered in a phone number.
User NT Account
Required for users who will be logging in using their network ID and network password.
This field should be blank for users who will be logging in with an email address and a password created in the Governance Portal instead of the user's network ID and network password.
Type in users network ID from his NT Account. This must include the domain name (e.g. CENTRAL\right01).
Note: Entering the network ID will allow users to authenticate through the system and access information (e.g. assessments etc.) directly from email links.
User Password
Creating a new user only: Type in a user password. Password must be at least 6 alphanumeric characters.
Note: This field should be blank for users who will be logging in using their network ID and network password.
Language and Culture
Required. Select the users' language and culture from the drop-down menu.
Note: This will be the default language and culture settings when they initially log into the Governance Portal. However, the user can change their own language and culture settings from their account settings once they have logged into the Portal. For more information, see Using Multiple Languages in the Governance Portal
Default Context
Required. Select the users' default context from the drop-down menu.
Note: The default context controls what the users will see when they log into the Governance Portal. For more information, see Contexts.
Role Names
Optional. Type in the role name for the roles where the user will be included. Multiple role names are separated by a semicolon.
Notes:
- Role names can be found by running the User Role admin search. For more information, see Admin Searches.
- Roles can only be mass assigned at the enterprise level.
User Group Names
Optional: Type in the manes of the user groups where the user will be included. Multiple names are separated by a semicolon.
Note: User Group names can be found by running the User Group admin search. For more information, see Admin Searches.
Sharepoint User
Optional: By default, this field is set to "FALSE". Setting this field to "TRUE" will activate this user to use SharePoint when managing attachments. If this field is left blank, the user will not be activated to use SharePoint.
Note: Your system must be individually configured to utilize SharePoint. For more information, contact RTS Technical Support.
Active
Optional: By default, this field is set to "TRUE". Setting this field to "FALSE" will lock the user's account. If this field is left blank, the user will not be activated.
Copy User Email
Optional: To copy role and/or user group information from another user, enter the user's email in this field.
If the Copy Roles or Copy User Group columns are set to "TRUE", the system will copy the roles or user groups assigned for the user associated with the email address.
Copy Roles
By default, this field is set to "FALSE". If this column is set to "TRUE", the system will copy the roles assigned to the user associated with the "Copy User Email" email address.
Copy User Group
By default, this field is set to "FALSE". If the Copy User Group columns are set to "TRUE", the system will copy the user groups assigned to the user associated with the"Copy User Email" email address.
