|
|
|
|
Manage Filters in Assessment Hierarchy
Filters help you streamline assessment information in the  Assessment Hierarchy tree. With the help of filters, you can choose which objects you would like to be displayed.

Default Assessment Hierarchy Filters
Assessment Hierarchy has 3 default filters: ![]() Design,
Design, ![]() Open, and
Open, and ![]() Closed. These filters are available out-of-the-box with Assessment Hierarchy for new clients. Existing Governance Portal clients will have to add these filters manually once they add the Assessment Hierarchy to their ribbon. Here is how you can add the default filters manually, if you are upgrading from an older version of the Governance Portal. As their names suggest, the Design filter will show the assessments currently in Design mode, the Open filter will show all open assessments, while the Closed filter will show the assessments that are now closed for responses.
Closed. These filters are available out-of-the-box with Assessment Hierarchy for new clients. Existing Governance Portal clients will have to add these filters manually once they add the Assessment Hierarchy to their ribbon. Here is how you can add the default filters manually, if you are upgrading from an older version of the Governance Portal. As their names suggest, the Design filter will show the assessments currently in Design mode, the Open filter will show all open assessments, while the Closed filter will show the assessments that are now closed for responses.
Execute a Filter
- Select a filter from the Filters drop-down menu in the navigation bar.
OR:
- Right-click the filter in the Filters drop-down list and select View Cached Results or View Live Results, depending on the result you selected in the Schedule tab.
Add a Filter
- Select
 Add New Filter from the Filters drop-down list in the navigation bar at the top of the screen. The Filters drop-down is set to All Assessments by default.
- Each filter is assigned a default name that you can update by typing a new name in the Name text box.
Note: Name is a required field. You cannot leave it blank.
- Select a view definition from the View Definition drop-down list. The Default Assessment Hierarchy View is the default view definition for the assessment hierarchy tree. Following are the columns within this view definition:
- Folder Name
- Assessment Name
- Object Type (All Entities and RCM Sub Objects)
- Iteration Type (Standard, Page, Matrix, Dual Matrix)
- IsTemplate (True, False)
- Assessment Status (Design, Open, Closed)
- Created, Updated, Opened, Closed (Date)
- Created By (Assessment template)
- Last Modified By(Assessment template)
- Created By (Assessment)
- Last Modified By(Assessment)
Note: For more information on view definitions, see the Manage View Definitions topic.
- Fill out the following information:
 The Objects Tab
 The Filter Tab
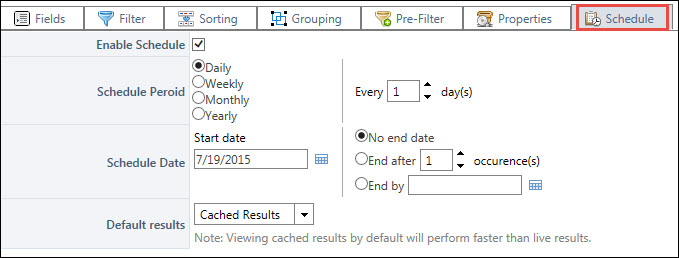
 The Schedule Tab
- Click
 Save to save your changes,
  Run to run the filter without saving, or
  Cancel to undo your changes.
Edit a Filter
- From the Navigation Bar: Right-click the filter you want to edit, from the Filters drop-down list, select
 Edit Filter. OR:
 - Edit the Existing Filter: After a filter has been executed, select
 Edit Filter from the drop-down list.
 - Update the the following information, as needed:
- The Objects Tab
- The Filter Tab
- The Schedule Tab
- Click Save to save your changes, or Cancel to undo them.
Delete a Filter
- Right-click the filter you want to delete from the drop-down list, select
 Delete and click OK to confirm the deletion.
OR:
- Select the filter you want to delete from the drop-down list and select Edit Filter.
- Click Delete to delete the filter.
- Click Save to save your changes, or Cancel to undo them.
Note: You can edit or delete the default filters.