Matrix style object based questions allow users to update multiple fields for objects all within the same matrix. When creating an object based assessment, the user scopes the objects to be used in the assessment. When creating a matrix-based question, you will choose the text and information for the scoped objects, and then choose the object fields that the assessor will respond to. Each scoped object will appear as a row in the matrix, and the evaluation answers (i.e. object fields) are represented by columns.
Note: The assessment type and object are chosen in the Assessment tab of the Setup Screen during initial setup of the assessment.
The example below shows a matrix question in a risk assessment. Each object you will be evaluating (in this case, risks) will appear in a row (1) on the left-hand side. The segments (2) to the right organize and contain the answer columns (3) where the assessor updates the specific fields in the object form.
Note: You can use different field types for each segment. In the screenshot below, the Risk Attributes and Status segments are based on category fields while the Review Date segment is based on a date field.

- Access the Questions tab for the the matrix based assessment.
- Mark the checkbox next to the page you wish to update and click
 Insert question or visual element.
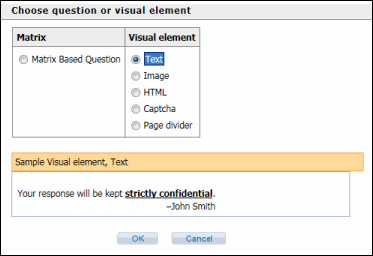
- You may choose to add either a matrix-based question or a
 visual element.
 - Click OK.
Basic Information
The following basic information needs to be completed when creating a matrix question:
Note: Required fields are marked with an asterisk (*)
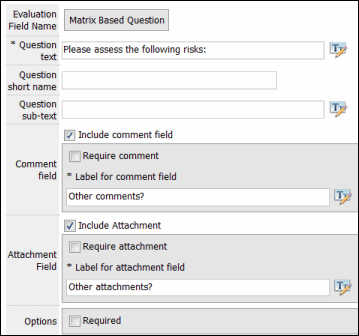
- Evaluation Field Name (Display Only): Displays the question type for the assessment.
- * Question text: The text used in the Assessment question.
Note: Question text must be defined for each language in the Assessment
- Question short name: The question short name is a name that will be used in reports. If the question short name is not defined, the question name in the default language for the Assessment will be used.
- Question sub-text: The question sub-text displays below the question name and can be used to give instructions on how to answer the question or clarify information provided in the question name.
- Comment field: Select the Include comment field checkbox if you would like to include a comment field below your question. Then, select whether a comment is required and type the label for the comment field.
- Attachment field: Select the Include attachment field checkbox if you would like to include an attachment field below your question. Then, select whether an attachment is required and type the label for the attachment field.
- Select the Required checkbox to require the assessor to answer the questions before finishing the assessment.
Matrix Rows
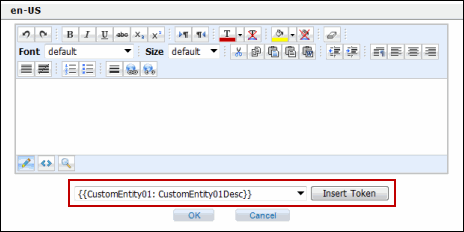
This section defines the object information that will be displayed in the rows. The Row Text field displays the text and fields on the object form (e.g. Risk Name for a risk, below) that will be duplicated for each object scoped in the assessment (Example 1 of the sample screenshot, above).

- Click the
 Rich Text Editor.
 - Enter the text you would like to be included in the row.
- To add field data, place your cursor where you would like to add the field, select the field from the drop-down list and click Add Token.
- Click OK when finished.
Matrix Segments
Matrix segments contain the columns that will appear in the assessment. By default, there is only one segment to begin with. You can create additional segments by clicking Add segment or click ![]() Delete next to a segment to remove it from the matrix. You can also use the
Delete next to a segment to remove it from the matrix. You can also use the ![]() Arrow Keys to change the position of the segments.
Arrow Keys to change the position of the segments.
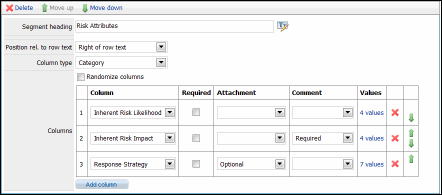
The following fields need to be completed when creating a matrix question:
- Segment heading: Type the text to appear in the segment header.
- Position Relative to row text: Select whether the segment will be displayed to the right or left of the row text in the matrix.
- Randomize columns: Select this checkbox to make the order of the columns in the segment random when the question is presented to the assessor. By default, the columns are shown to respondents in the order in which they appear in the columns table.
- Column Types: Choose the field type used in the columns for this segment. There are two types to choose from:
- Object Evaluation Fields: Existing fields in the Governance Portal that can be updated using the answers attained in the assessment response. Your choice of fields depends upon the selected object. For instance, if you chose Risk as your object and Category as your field type, you would be able to select from all category fields that are available for a risk.
For each value, you have the option of modifying the text, adding an action plan, requiring a comment or attachment upon selecting the value as an answer, or changing the sort order of the values. You can also choose a default value, either from your own choosing or use the default value that currently exists for that field in the Governance Portal. There are five different field types:
- Category: Answer choices (field values) appear in the form of a drop-down list of categories in the assessment.
- Memo: This field allows for free form text entry.
- Decimal Field: This field allows for free form entry of number values.
- Boolean Field: This field allows the assessor to select answer from two choices (field values), usually in the form of a checkbox.
- Date Field: Allows entry of a date into the field.
- Answer Types: Allows you to create columns with fields that are separate from the object you are evaluating. You will need to manually enter text for each column entry.
- Radio Button: Displays answer choices as radio buttons, of which only one can be selected.
- Checkbox: Displays answer choices as checkboxes, of which more than one can be selected at a time. You have the option of choosing the minimum or maximum number of answers an assessor can choose.
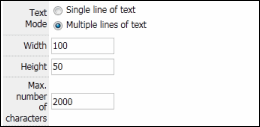
- Text: Displays text fields that allow for free form text entry. Choose whether you would prefer to enter a Single line of text or Multiple lines of text in the field. Set the Width of the entry fields in pixels. Set the Height of the entry fields if you are in Multiple lines of text text mode. Also, you can set the maximum number of characters to limit the inputted vale in the Max. number of characters field. In addition, you can make the answer required and choose for the assessor to include attachment or comment for each column, which can be required or optional.
- Number: Displays a field that allows entry of numbers only. You have the option of choose the minimum or maximum number or set the required sum of the values in the column. In addition, you can you can make the answer required, set the width of the fields and choose for the assessor to include attachment or comment for each column, which can be required or optional.
- Date: Allows you to pick a date in the field. In addition, you can you can make the answer required or choose for the assessor to include attachment or comment for each column, which can be required or optional.
- Drop Down List: Displays answer choices in a drop-down list. In addition, you can you can make the answer required or choose for the assessor to include attachment or comment for each column, which can be required or optional.
- Object Evaluation Fields: Existing fields in the Governance Portal that can be updated using the answers attained in the assessment response. Your choice of fields depends upon the selected object. For instance, if you chose Risk as your object and Category as your field type, you would be able to select from all category fields that are available for a risk.
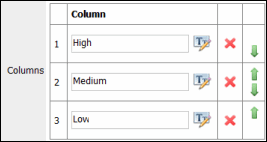
- Add Columns: Click Add Column to add columns to your selection. Conversely, you can click
 Delete next to a column to remove it from the segment. You can also use the
  Arrow Keys to move the columns up and down in the segments. There are additional options that are available depending on the column type you choose.
- Comments/Attachments: You can select whether you want to include the comments and attachments in the survey against each column of the matrix. You can select either Optional or Required from the drop-down menu under the Attachment or Comment column while creating a matrix question.
When you have completed creating your and determining the content of your matrix, click Spell Checker to run a spell check, Save to save the changes, or Cancel to cancel without saving.
