Create an Action Plan
- Access the object to which you wish to add an action plan (e.g. process, risk, control, objective, work paper etc.).
- Click the Action Plans tab.
- Click
 Add in the Action Plan section to add action plans through in-line editing or click Add to open the action plan form in a separate window.
Note: The default Action Plan Form is the same no matter where it is created.
In-line View

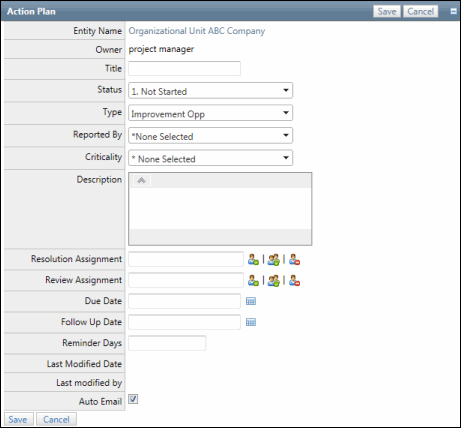
Action Plan Form

- Notification: Click this link to send ad-hoc email notifications to specific users regarding this action plan.
Note: You can customize all notification information including recipients, sender email, subject, body text and footer using notification templates. See Ad-Hoc Notifications for details.
- Enable Auto Email - Select this check box to automatically send email notification to assigned users (users assigned as the resolution owner, the reviewer as well as any user in the action plan notification role when an action plan is created, edited, deleted, or closed).
- Entity Name - displays the name of the object (e.g. organizational unit, work paper etc.) where the action plan is being created.
- Owner - The individual who created the action plan
- Enter an Action Plan Name.
- Select a Type from the drop-down list.
- Select a Criticality from the drop-down list.
- Enter an Action Plan Description.
- Resolution Assignment - Click
 Select User or
  Select User Group and then search for the individual or user group responsible for this action plan.
- Enter text that contains the name, email address or network ID of the user you wish to select and click Execute or click Show All.
Note: A list of users containing, (not equaling), the entered text will display in the search results.
- Click the name of the user or click Select No User to indicate the user is not required.
- Enter text that contains the name, email address or network ID of the user you wish to select and click Execute or click Show All.
- Review Assignment - Click
 Select User or
  Select User Group and then search for one or more individuals or user group responsible for reviewing this action plan.
 - Enter text that contains the name, email address or network ID of the user you wish to select and click Execute or click Show All.
Note: A list of users containing, (not equaling), the entered text will display in the search results.
- Click the name of the user or click Select No User to indicate the user is not required.
- Enter text that contains the name, email address or network ID of the user you wish to select and click Execute or click Show All.
- To search for a user, type in the User Name, User Email,
- Review Status - displays the status of the review of the action plan.
- Enter a due date.
Note: Notifications are generated on the due date indicating tasks are due but not complete.
- Enter a follow up date.
Note: Notifications are generated on the follow up date indicating follow up is due but not complete.
- Enter a number in the reminder days field to determine how many days after the follow-up date a reminder notice will be sent indicating the action plan is past the follow up date but is not complete. Select the Auto Email check box if you would like an email automatically generated with the reminder notice.
- Click
 Save or Save.
Notes:
- The Initiated by and Last Modified By fields are updated on the action plan form.
- Click History to view all of the changes that have occurred for this action plan.
- The Objectives, Risks, Risk Event Categories and Control Lists are displayed at the bottom of the action plan. Each action plan can be linked to one or multiple objects within the Risk Control Matrix.
Link an Action Plan to Objectives, Risks, Risk Event Categories. Controls, Incidents, Impacts, and/or Indicator Measurements
- Click Link for each list on the Action Plan Form.
- Place a check mark next to the objective, risk, risk event category, control, incident, impact, or indicator measurement you wish to link.
- Click Save.