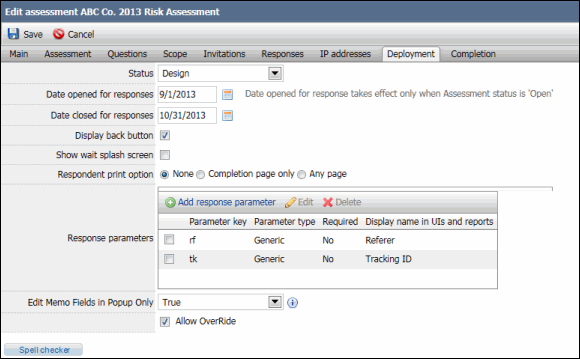
Deployment Tab - Object Based Assessment
The deployment tab contains the available options when deploying the assessment to the respondent.

- Status: There are three status types.
- Design: Your assessment is set to Design status by default when you create a new assessment. You cannot deploy an assessment in Design status. If an assessment has been deployed, respondents cannot take the assessment. User with design privileges to the assessment can make modifications to the content of the assessment.
- Open: You will change your status to Open once you have created your assessment, added questions, and are ready to deploy. Assessments have to be in Open status in order to be deployed. Users with design privileges can still make changes to the assessment content.
- Closed: Once you have deployed the assessment and received your responses, set your assessment to Closed status. Once an assessment is closed, it can no longer be deployed or receive responses.
- Response Open/Close Date: Enter the date range for the respondents to complete the assessment.
Note: If the response Open/Close range is not defined, the assessment responses will be accepted as long as the assessment is in Open status.
- Display back button: Select this checkbox to give respondents the ability to navigate between pages in the assessment. If this checkbox is not selected, respondents cannot go back to previous pages of the assessment.
- Show wait splash screen: Select this checkbox to display a wait status splash screen when a participant accesses the assessment. The message for the splash screen can be customized in the messages screen for the assessment. Please note that you may also see a splash image along with the wait message text if an assessment takes time to load.
Note: For more information, see Assessment Messages.
- Respondent print option: Select one of the options that control the printing and PDF generation function available to the respondent when they take an assessment.
- None: Printing and PDF generation are not available in the assessment.
- Completion page only: Printing and PDF generation are available only on the completion page.
- Any page: Printing and PDF generation are available on all assessment pages.
- Response parameters: Response parameters are URL parameters used by respondents to take an assessment. These parameter values can be recorded and associated with the responses. Response parameters can also be used for tracking or system integration purposes. A common use of response parameters is to track the web site the user was visiting when they accepted to take the assessment.
- Add a response parameter: Click
 Add response parameter and fill out the following fields. Click Save when you are finished.
- * Parameter key: The key for the parameter as it will appear in the URL (i.e. &key=value&..)
- Required: Select this checkbox to require a value in the URL for the respondent to take the assessment. IF it is a data entry person identifier parameter and a person has been identified as entering data for the response, then a value for the parameter is not required in the URL, even if the required flag is set for the parameter.
- Display Name in UI and reports: Enter the parameter name as it would appear in the assessment or report.
- Parameter Type: There are three types of parameters:
- Generic: This is the default parameter type and is suitable for most uses.
- Response identifier: This parameter value is used to identify a unique response. The response with the specified value for the parameter will be resumed if it exists in the system.
- Data entry person identifier: The value for the parameter identifies the person entering the data on behalf of a respondent. The value for the parameter must match the External User ID for the user. The user identified must have 'Bulk data' privileges to be able to enter the response data.
- Edit a response parameter: Highlight the response parameter, click
 Edit and make your changes. Click Save when you are finished.
Delete a response parameter: Highlight the response parameter and click![]() Delete.
Delete.