Time and Expense Administration
The settings tab allows administrators to setup and administer the Time and Expense section of the Audit Workbench. From this tab, the administrator can enable time and/or expense reporting, choose to display tasks and activities, set the report period, and add any non-audit related projects. Once the initial setup has been completed, the auditors can then update their time and expense information. To access the admin portion of the Time and Expense section:
 Access the Time and Expense page.
- Click
 Administrator from the navigation bar at the top of the screen.
- Select the check boxes at the top of the screen to enable time and/or expense reporting features.
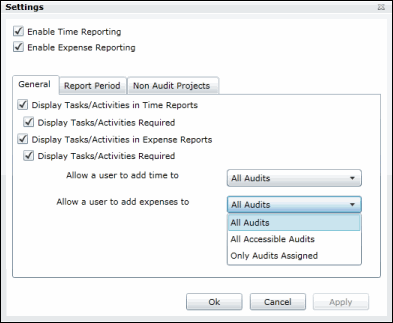
- In the General tab, select the check boxes to display user tasks and activities in the Time/Expense reports and make them required, if necessary.
Select one the following options from the Allow a user to add time to/Allow a user to add expenses to drop-down lists to determine which audits the auditor can choose from when updating a time and/or expense report:
- All Audits: Auditors can add time/expense to any audit in the system.
- All Accessible Audits: Auditors can only add time/expense to audits for which they have view permissions.
- Only Audits Assigned: Auditors can only add time/expense to audits assigned to them.
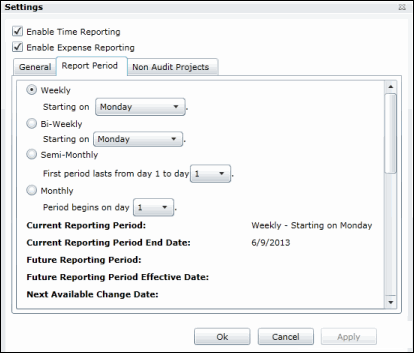
- The Report Period tab enables you to set the report period on a weekly, bi-weekly, semi-monthly or monthly basis and determine what dates the report period will begin.

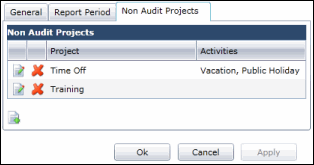
- The Non Audit Projects tab displays the non-audit related projects that the auditors can report on in addition to their audit activities.

- Click
 Add Project to add a non-audit related project. Add the project name, the activities associated with the project, and choose an activity as a default, if necessary. Click OK when finished.
Note: Click
 Delete to remove a non-audit project from the list.
 - Click OK to save your changes to the Time and Expense setup screen.
