Edit an Immediate Dispatch Notification Template
- Access the Notification Template screen.
- Click on the Subject of the notification template in the Email Notification Templates - Immediate Dispatch section.

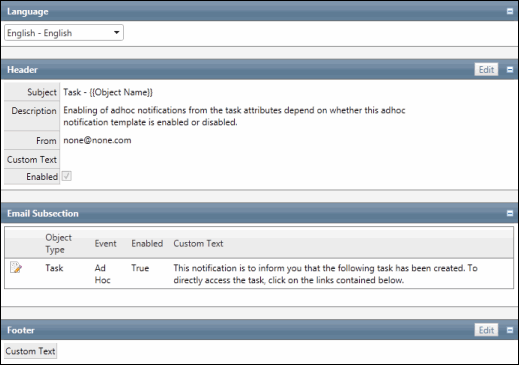
Header
This section allows you to edit the information at the top of the notification email sent to the users.
- Click Edit in the Header section to edit the following fields:
- Subject - Enter the subject of the email.
Note: Click Add Token to include system information in the custom text, such as the triggering user (i.e.notification email sender), site name and object name in the subject line.
- Description - Enter a description of the notification template.
Note: This field is for informational purposes only and will not appear in the email sent to the users.
- From - Enter the email address that will be included in the "From:" field in the email.
- Custom Text - Enter the text you would like to include in the top of the email.
Note: Click Add Token to include system information in the custom text, such as the triggering user (i.e.notification email sender), site name and object name in the custom text.
- Enabled - Select this checkbox to enable notifications to be sent from this template.
- Subject - Enter the subject of the email.
- Click Save.
Email Subsection
This section section is where you customize the recipients and the body text that will appear in the email for each event. The pre-created templates will already have existing events that you can enable or edit at your discretion.
- Click
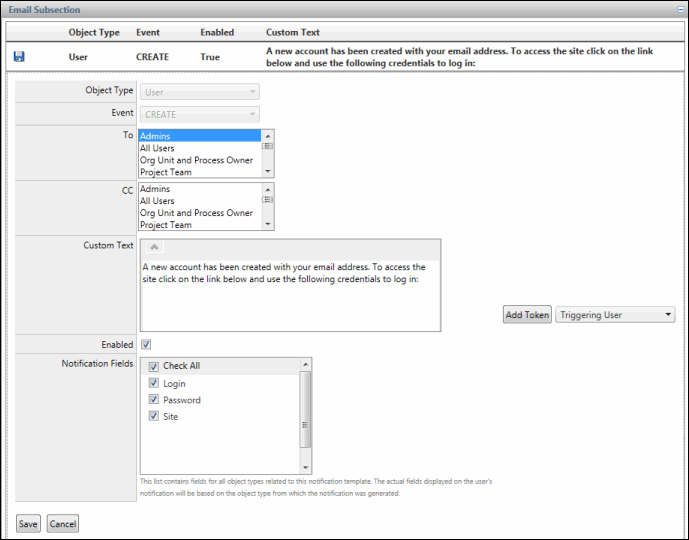
 Edit next to the event. The following fields are available:
- Object Type: The object from where the event will occur.
Note: The object type cannot be edited in an immediate dispatch template.
- Event: The action in the system that triggers the notification email.
Note: The event cannot be edited in an immediate dispatch template.
- To: Select the role(s) of the users to whom you wish to include in the "To:" field of the notification email. All roles with view permission access on the selected object type are listed. Hold the Shift or Ctrl key to select multiple roles at the same time.
Note: When selecting a role in the notification template subsection, all users that are linked to that role at the enterprise, entity or object level will be notified. This could cause a user linked to a role at the enterprise level to receive many event notifications. This scenario can be mitigated by appropriate entity and object level security configurations. For more information contact
 RTS Technical Support.
 - CC: Select the role(s) of the users to whom you wish to include in the "CC:" field of the notification email. All roles with view permission access on the selected object type are listed. Hold the Shift or Ctrl key to select multiple roles at the same time.
Note: When selecting a role in the notification template subsection, all users that are linked to that role at the enterprise, entity or object level will be notified. This could cause a user linked to a role at the enterprise level to receive many event notifications. This scenario can be mitigated by appropriate entity and object level security configurations. For more information contact
 RTS Technical Support.
 - Custom Text: The text that appears in the body for each event.
Note: Click Add Token to include system information in the custom text, such as the triggering user (i.e.notification email sender), site name, and object name.
- Enabled: Select this checkbox to enable notifications to be sent for this event.
- Repeat Subsection Custom Text: Select this checkbox to repeat the email subsection text above each event displayed in the notification email.
- Notification Fields: Select the fields that you wish to be displayed in the immediate notification email.
Note: See Ad-Hoc Notifications or System Notifications for more information on the types of notifications used with immediate dispatch templates.

- Object Type: The object from where the event will occur.
Footer
This section allows you edit the footer information at the bottom of the notification email sent to the user.
- Click Edit in the footer section at the bottom of the screen.
- Edit the custom text for the footer.
Note: Add Token to include system information in the custom text, such as the triggering user (i.e.notification email sender), site name and object name.
- Click Save.